For my GSoC project, I will be developing plugins for Jenkins Community. We required two things:
- Track objectives and issues in one place
- Manage code reviews and plugin releases
Issue Tracker
For the first problem, we started using GitHub Project boards for objectives and GitHub issues for issues. Project boards were a bit clumsy so we preferred using a Google Doc instead. For issues, the GitHub issues are just okay but we felt keeping discussions and codes separate is a better idea.
For a good reason, Jenkins community hosts it’s own JIRA server where this can be managed quite well. JIRA issues can be more verbose while being separate from the code itself. JIRA issues can take various forms, namely:
Bug- For filing bug in the codeEpic- For categorising issues in one placeTask- For creating a task for the futureStory- For stories about a user’s experience with product or featureNew Feature- For adding a new featureImprovement- For improving an existing feature
There are multiple other configurations that can help organising issues, to learn more see here.
JIRA also provides support for project boards to track progress in the form of scrum boards or kanban boards. Scrum boards are basically like trello that lets use divide a virtual board into various sections such as TODO, In Progress, In Review, Done etc. and place issues, which take the form of cards, in the stage depending on their progress. Also allows you to create sprints which are bounded by time. More about it later. Kanban boards are also similar but with higher level of customisation that can lead to ambiguity in case of small team projects. It comes down to your preference. You can learn about the differences here.
For our project, we decided to use:
-
JIRA Issues- These can exist in all possible forms (task, story, bug, improvement etc) based on the requirement -
EPIC- To organise issues of each GSoC phases in separate categories. So we created four EPICs, namely, -
Scrum BoardandSprints- To keep a track of our progress by both mentors and students.A scrum was created with the name:
Google Summer of Code 2019- link
Four sprints were created to track the issues of all GSoC 2019 projects under Jenkins, namely:
GSoC 2019. Community BondingGSoC 2019. Code Phase 1GSoC 2019. Code Phase 2GSoC 2019. Code Phase 3
JIRA Scrum boards comes with another section called Backlog which has a list of features, defects, experiment, enhancement etc that needs to be done in the future which is not part of a time bound sprint.
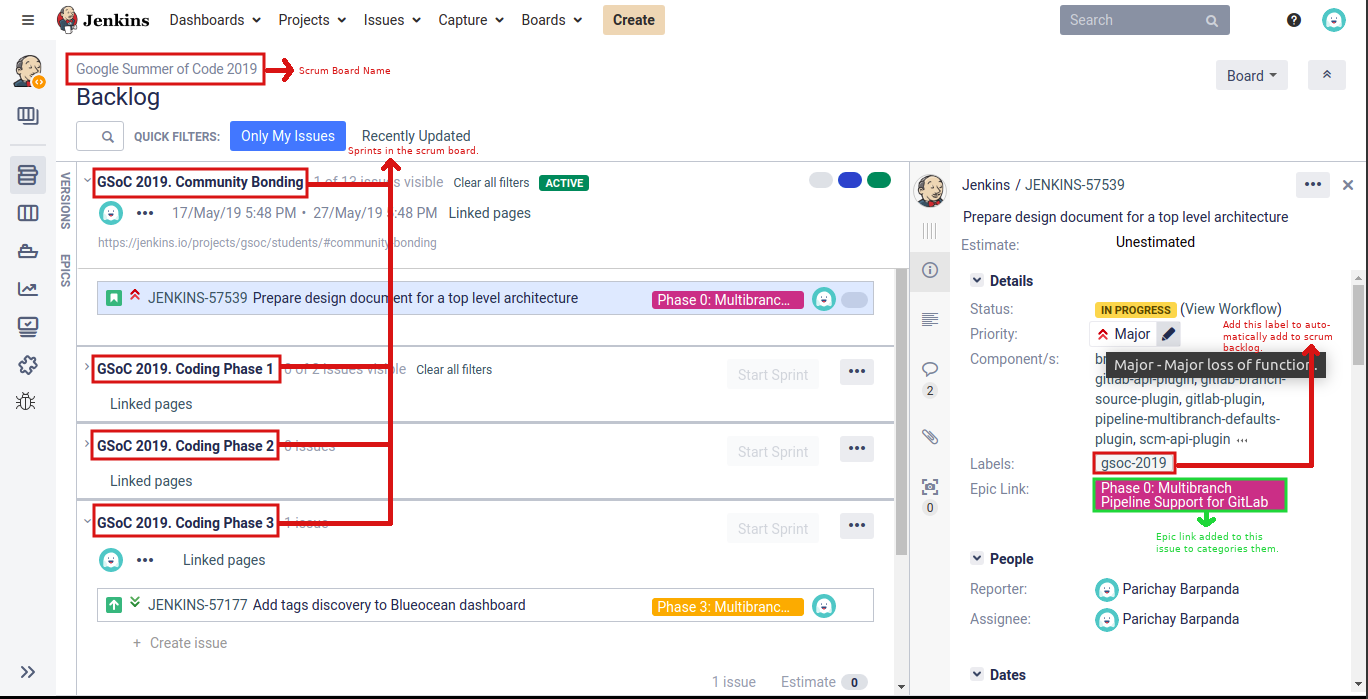
The Backlog Section of Scrum Board
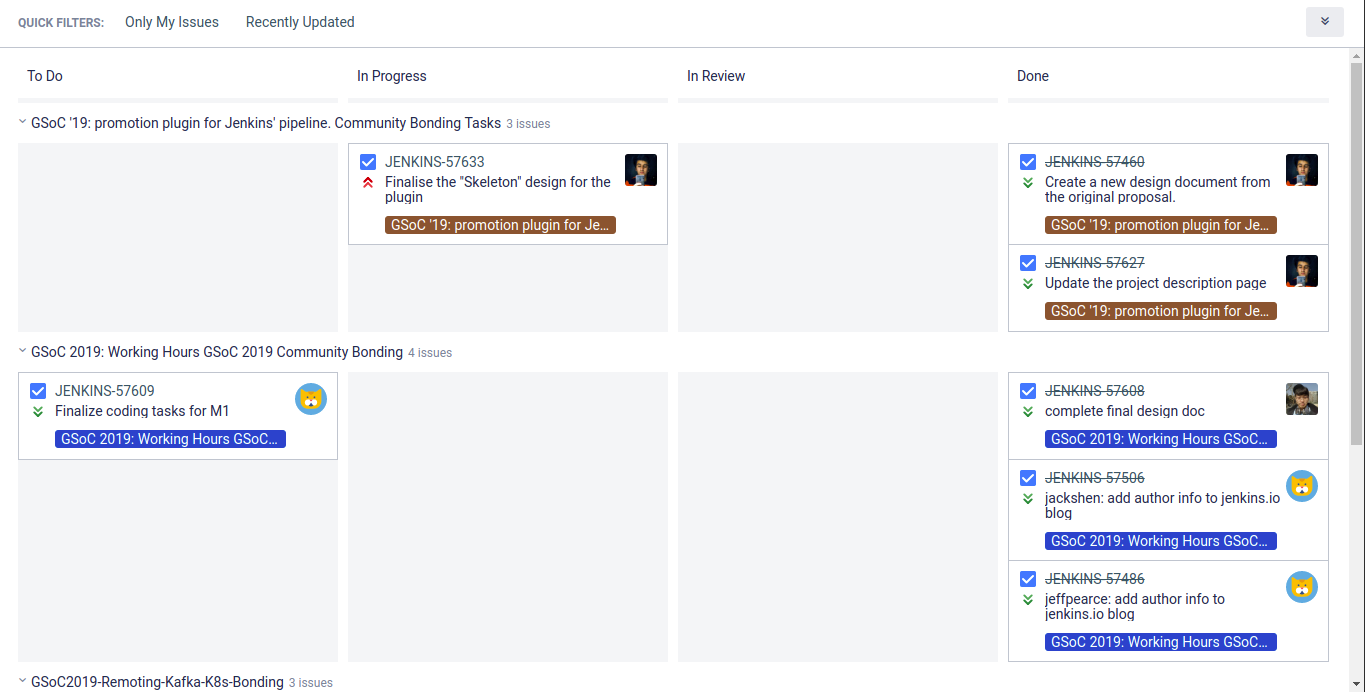
The Active Sprints Section of Scrum Board
To add issues to the sprints you can either add the desired sprint’s link at the time of issue creation or simply drag and drop from the backlog. There are also other sections that can be helpful like releases, tests, components etc.
One of the interesting feature of JIRA is JIRA Query Language (JQL). This allows you to define filter for searches. You can have predefined filters for the board as well.
Select Board (top right) then Configure then Quick Filter. For example:
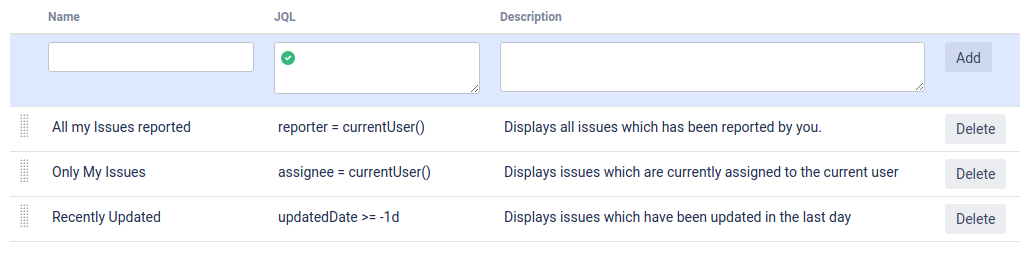
Quick Filters in our scrum board
You can define your own filters. JIRA also offers lots of other customisations options like card colours, columns, issue detail view etc. You can explore them based on your needs.
Git Workflow
For our project we chose Git over any other SCM like Subversion or Mercurial since all Jenkins repositories are hosted on GitHub and Git makes merging simpler than others. There multiple Git Workflow Models like Feature Branch Workfow, Gitflow Workflow etc. We decided to follow Gitflow Workflow. The idea is to 3 mainline branches and temporary feature branches:
master- Only tagged commits fromdevelopbranch are merged into this branchdevelop- When a feature branch is complete it is merged into this branchrelease- After a feature implementation passes all tests and reviewed then it is merged into this branch<feature-branch>- A branch checked out fromdevelopbranch when a new feature has to be implemented
This stricting branching model can be tedious to maintain through git CLI. To aid in this development cycle a tool called Gitflow is used.
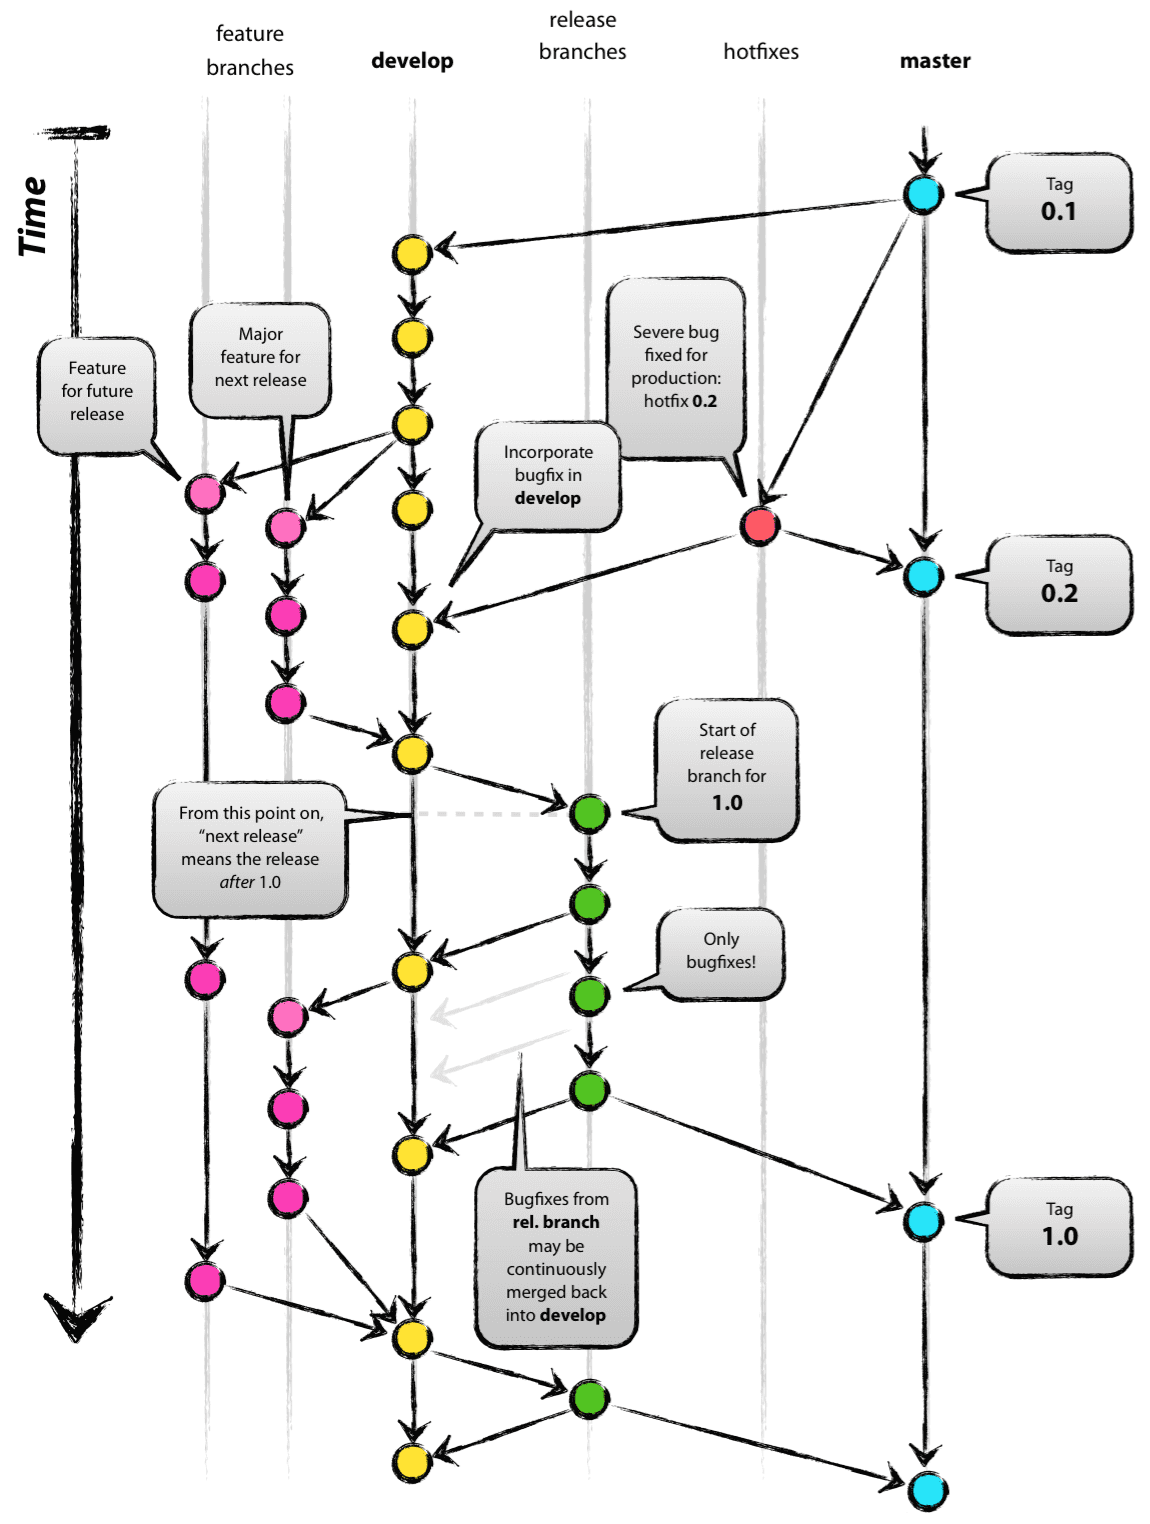
A visualisation of the gitflow model [1]
Git Flow is simply a wrapper around Git that abstracts the underlying branch modelling with intuitive commands.
NOTE: This Gitflow Workflow is slightly modified in order to use Pull Requests for git merge instead of a plain git merge.
On Ubuntu, install git-flow using:
sudo apt-get install git-flow
For other OS, see this.
To start the workflow, run:
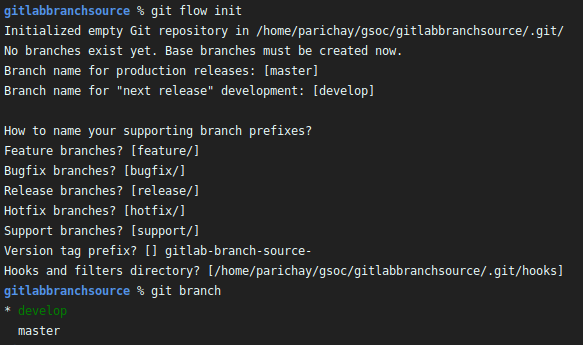
git flow init
Then follow the on-screen instructions for setup.
To start a feature branch
git flow feature start <feature-branch>
In the background it does a git checkout develop and git checkout -b <feature-branch>.
Push commits to the feature branch.
Start a pull request
This is a custom step and not a part of Gitflow workflow, if your repository doesn’t need you to send PRs then feel free to move on to the next step.
Push the feature branch to GitHub and start a pull request to merge into the develop branch. After merging this PR, do a local sync using git pull origin develop and manually delete the feature branch using git branch -D <feature-branch> (to delete local branch) and git push origin :<feature-branch>. You might also want to do git fetch --all --prune on other machines.
To finish a feature branch [Skip if sending PR]
git flow feature finish <feature-branch>
In the background it does a git checkout develop and git merge <feature-branch>.
To start a release branch
This step is to fork a release branch off of develop branch after enough features are acquired for a release.
We only push bug fixes, documentation and other release-oriented tasks to ~release_ branch.
Once it is ship ready, the release branch gets merged into master and tagged with a version number. In addition, it should be merged back into develop.
Using a dedicated branch to prepare releases makes it possible for one team to polish the current release while another team continues working on features for the next release.
To create a release branch:
git flow release start <version-number>
In the background it does a git checkout develop and git checkout -b release/<version-number>.
Push commits to the release branch.
To finish a release branch
git flow release finish '<version-number>'
In the background it does a git checkout master, git merge release/<version-number>, git checkout develop and git merge release/<version-number> and git branch -d release/<version-number>.
Sending pull request from release branch
We cannot send PRs from release branch and use the gitflow release finish step without breaking the PR workflow. If you do not merge your PR and follow the gitflow release finish step then the PR will be marked closed as the release branch will be deleted. If you want to do it then follow along, at the end there are manual steps to do it using the Git CLI.
The overall flow of Gitflow
-
A
developbranch is created frommaster -
A
releasebranch is created fromdevelop -
Featurebranches are created fromdevelop -
When a
featureis complete it is merged into thedevelopbranch -
When the
releasebranch is done it is merged intodevelopandmaster -
If an issue in
masteris detected ahotfixbranch is created frommaster -
Once the
hotfix iscomplete it is merged to bothdevelopandmaster
Graphical Tool to visualise the git flow
We will also use GitKraken Linux Client to manage commits, tags, branches etc. Personally I find it helpful.
There are other options like GitHub Desktop, Smart Git, Tower 2 etc.
Using plain Git to replicate the GitFlow Workflow
This workflow is slightly modified to support merging with the help of Pull Requests.
git init

git checkout -b develop

git checkout -b feature/<feature-branch>

# Push commits required for the feature

git push origin feature/<feature-branch>

# Send PR to develop branch

# Merge PR after review by mentors

git pull origin develop

git branch -d feature/<feature-branch>

git push origin :feature/<feature-branch>

git checkout -b release/<version-number>

# Push commits to your release branches like bug fixes, documentation etc

git push origin release/<version-number>

# Send PR to develop branch

# Merge PR after review by mentors

git pull origin develop

git checkout release/<version-number>

git tag -a <tag-name> -m <your message>

git checkout master

git merge <tag-name>

git push origin master

git push origin --tags

git branch -d release/<version-number>

git push origin :release/<version-number>

# NOTE: In gitflow the release branch was merged with master and
# tag was merged with develop, but we doing opposite here
# since the PR has to be merged with the develop branch to see the
# files changed

git checkout develop

# start next development iteration
You can also check other simpler workflows:
Resources: